In the last shows Debbie showed us some great tips on how to make these sets go even further and I want to share some of these tips with you today.
Tip number 1.
When using a large sheet of transfers place the sheet onto your card and run it through your die cutting machine....this will save you time rather than rubbing the transfer on with the stick provided.
Tip number 2.
Lay your foil sheet onto the card you have added the transfers to and run this through your die cutting machine. This is not just because its quicker but mainly because you will have a perfectly flat foil sheet which you can use to make another card. Remove the foil and pop it to one side.
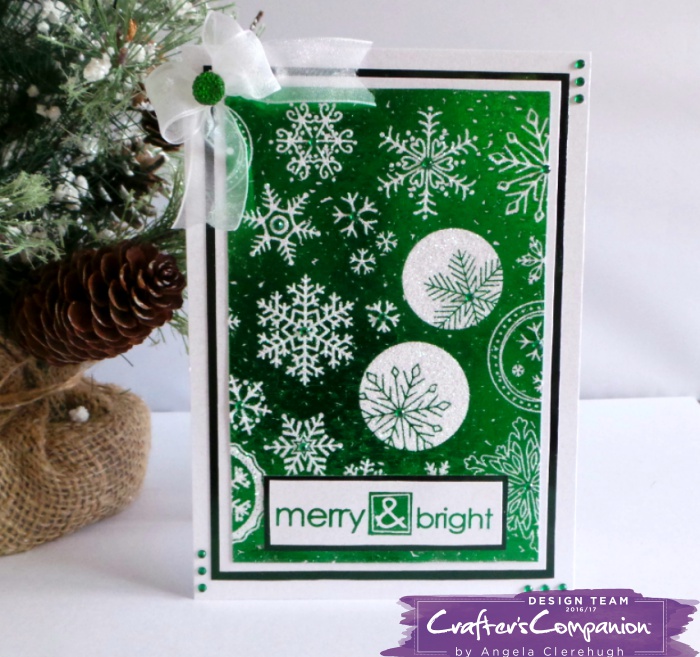
Tip 3.
Keep the patterned backing sheet from the transfer.
Using the method from tip 1 you will have the transfer pattern showing like this (after foiling):

Now to the clever bit...Tip 2 - how to get a second card using the left over foil. You will need an adhesive sheet (available from Crafter's Companion) and another piece of card. Cut a piece of adhesive sheet out to match the size of your card. Remove the backing paper from one side and stick it onto your card and then remove the top backing paper. Very carefully lay your 'used' foil down onto the adhesive (silver side down / coloured side up) and run this through your die cutting machine.
Carefully remove the foil sheet and you will now have something like this:
I used glitter to cover the 'white' adhesive patches.
I wasn't savvy enough to know this when I started using the foils so unfortunately I did throw away my foil from the first card but lesson learned....I won't be doing it again.
I don't have a third card to show you for tip 3 because I cut my foil transfer backing sheet down to make tags but here is what you can do. The backing sheet has the black pattern showing on it. You could take a piece of card and colour it with Aqua Markers or Aquatints or even use backing paper and then mount the foil transfer backing sheet onto the top.
I used mine for tags (see the red tag) and I used an adhesive sheet, applied red foil over the tag and then glued the backing sheet onto the top. The flowers hide the glue spot:

So, three cards with one foil sheet and the best part is you get four sheets in each pack so you could make a minimum of 12 cards (if you used the whole sheet for one card). Or perhaps you want to use the smaller transfers for tags. You can get four tags each sheet so using the three tips you would get 12 tags from one foil sheet, even more if you chose to use one element per tag....bargain!
I feel a challenge coming on, how many items can you make from on Foil Transfer pack....
Well, thanks for visiting and hope you have a fab weekend x
Items Used:
Foil Transfers
Foils
Centura Pearl Card
Luxury Cardstock
Ribbons & Gems
Beautiful cards and great ideas about the foil.
ReplyDeleteHappy crafting!
Great foil tips and love your frugal way to use up a piece. Beautiful samples. Shabneez x
ReplyDeleteWOW these are fantastic :-)
ReplyDeletewow that is amazine Angela ... love your cards and tag ... I have some of that foil ... got it in the crafters companion magazine last month ... have not used it yet ... better try and find it lol ... hope you have a great weekend ... happy crafting and love sandy xx
ReplyDeleteWow love these they are stunning!
ReplyDelete